
This post will focus on the few informal tests I have run on the BCLmacro. I wanted to also present some example photos and write about using it in the field, but will save that for "
Part III" because of the length of this article. Of course, I am far from qualified to rate this lens on a technical level and cannot perform tests like those you would find
here, but I do have a background in science and have tried to apply the scientific method in my examples. One caveat is that I am on a seismic vessel which is basically a floating factory... we even have to wear hard hats ;) Besides the back and forth movement from being on a boat everything is
CONSTANTLY vibrating. I thank the heavens for the image stabilization built into my EM5 on a daily basis. In addition, as stated in
"Part I" of this series my BCL was malfunctioning before the conversion so you may get even better results =) The take home message is, digest these "tests" with a grain of salt. They are only meant as a guide to help you get started taking awesome photos with your newly modified BCL!
I. Dirty Ruler Tests
The first thing I did after putting the BLCmacro into action was to assess it's working distance. I was awed at how close I had to be to achieve focus, but the scientist in me wanted a number. My solution for testing this was to place a ruler at the base of my camera, slightly tilt it down and assess the "in focus" area. Results of this test indicated that the working distance is about 7 cm and the DOF (in focus area) is about 5-7mm or roughly 1 cm. The photo below is a SOOC JPEG and not ideal to assess maximum sharpness because the iso equaled 1000 and shutter speed was 1/ (0.5*effective focal length) = 1/15. I have however provided a magnified view (not 100% crop) of the unedited RAW file to give a better idea of the focus at 6 vs 7 vs 8 mm. Again, this test was only done to give an indication of the working distance and DOF, in the following section we look at optimal sharpness =)
 |
| Working distance |
 |
| Magnified view |
I also used my very tarnished ruler to gain a feel for the magnification of this lens.. My macro knowledge is quite limited, but it is my understanding that magnification is dependent on your sensor's width. If you have an 18mm sensor (like m4/3 cameras do) then you achieve 1:1 magnification if you are able to photograph something 18mm across. To test the BLCmacro's magnification, I taped my ruler to a thick sketch journal so that it was standing and then got everything in focus and took a photo (see schematic introducing this section). In the photo below you can make out 12 through 16 cm which equals about 40mm. This is nowhere near 18mm and my "rounded" estimate is about a 1:2 magnification (40mm/18mm = 2.22).
 |
| Magnification |
In "Part I" I stated the magnification was roughly 1:3, but that was including the vignette (5mm on either side). I repeated the test in 2x crop (digital tele-converter) mode and was able to fit apx. 26mm into the frame. This backs up the idea that including the vignette the frame can "hold" 52mm (26 x 2).
 |
| 2x in camera crop (digital tele-converter) |
To summarize:
Working distance: 7cm
DOF: ~1cm
Magnification:
Entire frame (52mm) = 1:2.88
Usable (40mm) = 1:2.22
2x crop (26mm) = 1:1.44
You can also see that if you turn on your digital tele-converter the vignette and color fringing become negligible. This helps with framing (which I discuss more of in "Part III")
II. Money Shot
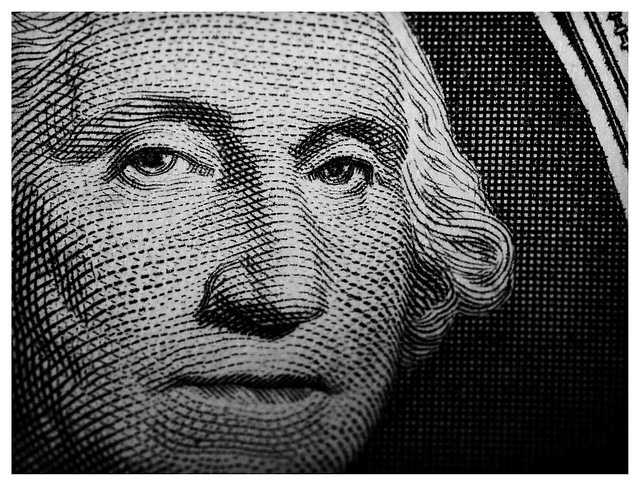
Testing the sharpness of the BCLmacro was inspired by the awesome photo above which was taken by one of my Flickr contacts,
Dave Elmore. For this shot he used the EM5 and Leica DG Macro Elmarit 45mm f/2.8 ASPH. I know its crazy to be comparing the modified BCL to the Leica, (because the latter is highly regarded and designed for macro, 14 times the price, and triple the effective focal length) but I was amazed at the level of detail captured by Dave and wanted to see how the BCLmacro measured up. For this test I taped my cleanest dollar bill (I only have 3 with me offshore haha) to the sketch book mentioned above and photographed under ambient lighting and after the addition of a small continuous light source (diffused flashlight). Photos were then taken at the following shutter speeds :
- 1/2*effective focal length (1/60)
- 1/effective focal length (1/30)
- shutter speed at which auto iso=200
Before I shot these, I lined up Mr. Washington's frame (the fancy area surrounding him) in the middle of the live view screen and then moved my magnification box (at 7x) around his eyes. After moving my camera into focus, I pressed the body against my desk to reduce vibration and depressed the shutter button. Also to counter camera shake I had "anti shock" set to 1/8 second. Below are the results of this test and for each of the shutter speeds I present the JPEG version of the unedited RAW file and a 100% near center crop (where my intentional focus was).
1. AMBIENT LIGHT
 |
| 1/60 sec, iso 3200 |
 |
| 1/60 sec: 100% near center crop |
 |
| 1/30 sec, iso 3200 |
 |
| 1/30 sec: 100% near center crop |
 |
| 1.5 sec, iso 200 |
 |
| 100% near center crop |
2. ADDITIONAL CONTINUOUS SOURCE
 |
| 1/60 sec, iso 200 |
 |
| 1/60: 100% near center crop |
 |
| 1/30 sec, iso 1000 |
 |
| 1/30: 100% near center crop |
 |
| 1/6 sec, iso 200 |
 |
| 1/6 sec: 100% near center crop |
These results overall seem fuzzy and the best out of the bunch IMO was the shot taken at 1/60 seconds with the addition of continuous light. I then took the photo at 1/250 shutter speed and iso 200 using the kit flash in manual mode (1/25) to see how the BCLmacro performed in optimal conditions.
3. FLASH
 |
| 1/250 sec, iso 200 |
 |
| 1/250: 100% center crop |
This photo was most definitely sharper than than any of the others. I actually took a series of photos with the flash ranging from 1/8 to 1/32 and chose this as the most correctly exposed. The next few photos represent:
A) George cropped and processed to taste:
C) George cropped to represent dimensions of Dave's photo, equal to: 1452 x 1117
D) 100% crop of processed photo
Although Dave's photo was not uploaded to Flickr at full resolution, it does not represent a crop. There is no doubt that in print his photo would look a lot better than anything the BCLmacro would produce. However I think that this underdog proved to be a fairly sharp, especially if you are able to take photos with an increased shutter speed. For this I recommend using some sort of flash. Elegant descriptions about the benefits of using flash for macro photography can be found in several places on
Robin Wong's blog in addition to many other sites on the internet. The use of flash for the BCL macro is actually essential in practice because of the short 7 mm working distance... but before I get ahead of myself and start talking about "real world use" I want bring up another feature of this lens that surprised me.
III. Pass the Butter
After assembling the BCLmacro, I accidentally took a photo of some of the super computers on board the vessel I am on. I was immediately amazed at the quality of bokeh my Frankenstein of a lens produced! I have dedicated the next portion of this article to giving examples of bokeh with the super computers as my subject. Photos are SOOC JPEGs that were taken using bulb mode on the OMD EM5. Using bulb mode allowed to to preserve an iso of 200 and stop the exposure when I saw fit.
 |
| 1/10 sec, iso 200 |
 |
| 1.6 sec, iso 200 |
 |
| 2.1 sec, iso 200 |
 |
| 5 sec, iso 200 |
I think if properly exposed then bokeh is nice and smooth. also since the aperture is fixed all light sources come out as perfect circles. The next two photos are 100% crops from the 1.6 sec exposure above and represent the best and worst "bokeh balls" in that frame.
 |
| Best |
 |
| Worst |
Looking at this example and realizing that this lens was produced to exhibit NO bokeh at all, I think that it gets at least an A- in this department. As with any macro lens, it is important that bokeh is smooth and does not distract from the subject that is in focus. Here are some examples of what to expect with the BCLmacro (photos are processed to my liking):
IV. Smells Fishy
Besides the heavy vignetting and color fringing, I wanted to end this post with a very short note on distortion. If you have already or are planning on dismantling your BCL you will notice that the original back end of the lens element is curved like a fisheye. This translates into the photos taken with this lens... especially when you are photographing straight lines. I think it adds to it's strange character, but if you are not a fan, luckily, the center is not impacted. Also, correcting in Lightroom is an option.
 |
| 100% crop for good measure and to keep you pixel peepers entertained ;) |
Working with the BCLmacro has been a wonderful roller coaster of trial and error... and I have only been using it for 4 days! As with anything, the more time you spend with something the more you learn about its properties. This post is already far too long so the next post will feature some tips for use and of course, more example imaged from the BCLmacro. Thank you so very much for dropping by. You are a trooper if you read all this text and deserve an electronic salute =) Please feel free to ask any questions about the modification or any part of this post.
Sam D.
One more bokeh example because I couldn't help it


No comments:
Post a Comment